Saturday 15 July 2017

Festive Holly Luxurious Christmas Card

A very good morning to you all.  
 
Well after a very hectic few weeks myself and Ozzie have finally moved into our new home.  It has taken us 3 weeks to decide which room I should have as my craftroom/studio but we finally decided to use the front lounge which is the biggest room downstairs.  We still have some finishing touches to make like shelving etc but we will get there and I have made sure we have space for a seating area so I can share my room with Ozzie, my daughter Zara and guests.....one thing I don't like when I craft is to feel isolated from the rest of the family :)  
 
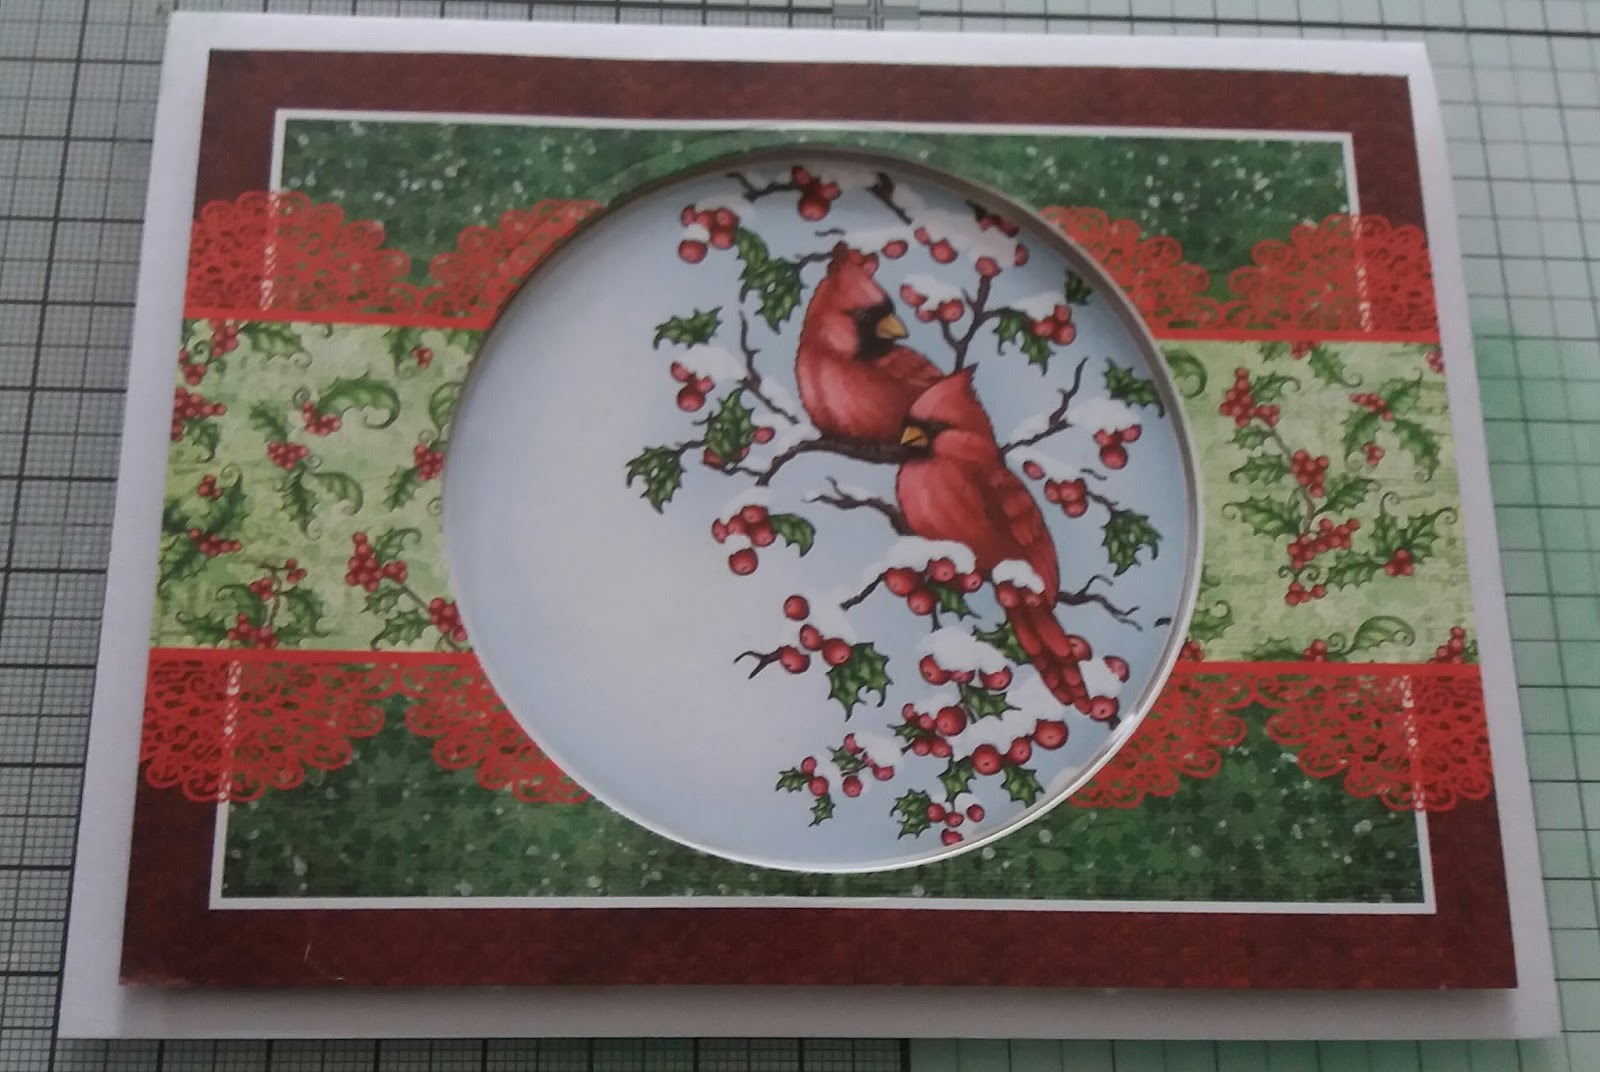
Today I have used the Heartfelt Creations Festive Holly Collection which was released world wide on Wednesday 12th July.  The collection is full of beautiful Red Cardinals, holly, berries and includes images of wagon wheels, a gorgeous Victorian lamp and bells. 


The collection also includes the Cardinal Haven stamp and die set which is still exclusive to Hochanda TV.  This will be available worldwide from the end of this month.
 
 
I have also included a few stamps and dies from a few other previous collections which include the Sparkling Poinsettia,  Celebrate the Season and the Snow Kissed Collection.
 
 
  • I have used a 5 1/4"  x  4 1/4" white card which is a perfect size for the smaller panels from the paper pad.
  •  Using a circle die from the Heartfelt Creations large circle die set  cut out the Cardinal image.  This die fits the image perfectly.
  •  Add some foam pads to the back of the panel and adhered this to the card base.

  •  The next step is to take the circle and adhere inside the aperture.  As you can see the outer panel is raised to give the card  3 dimension.
 
  • Die cut out the decorative die from the Festive Holiday die set in white medium weight cardstock and place this on the top of the card in the centre.
 
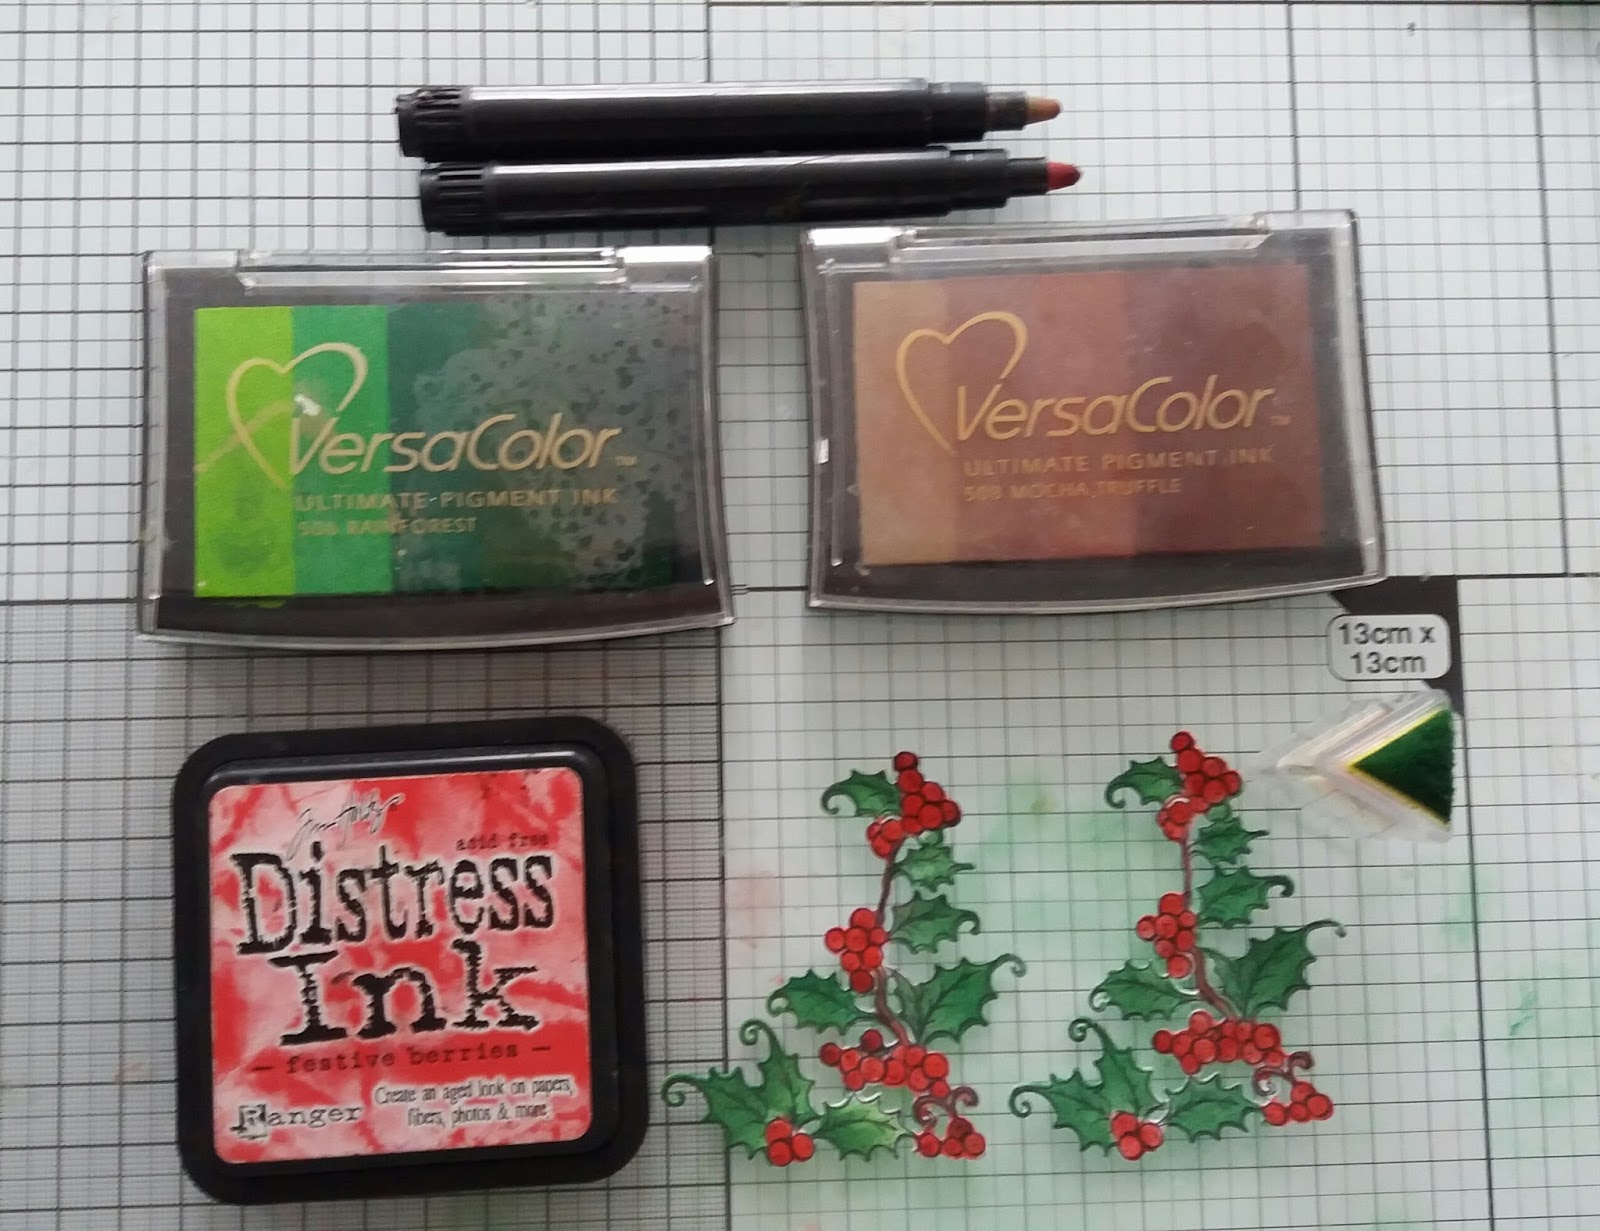
  • The next step is to stamp and die cut the images.


  • Using inks/pens of your preferred choice colour in the images.  I have used Fired Brick, Festive Berries and Scattered Straw Distress inks, Mocha Truffle and Rainforest Versacolor inks and a black pigment ink.
  •  I have used the 2 darker shades of green to colour in the holly and blended using the Heartfelt Creations Daubers.  The daubers are a great way to add colour and because they are precision triangle shaped you can get into very small areas.  They really are a quick way to colour and give a beautiful blended effect to your image.
  • I have used the same technique on the Poinsettias to create gorgeous.  You will need to use the 2 smaller flowers which you stamped and die cut earlier.
  •  The next images I coloured were the holly  and Cardinals.  For these I have also used the  Dove Blending pens as I find these perfect for much smaller details on my images.


  • Cut a strip of the red paper from the paper pad measuring 3 1/4" x 3/4" and also the Merry and Bright sentiment which is from one of the border strips.  Add a small amount of glue to each end of the sentiment and adhere to the red panel so that it is curved and adhere to the bottom centre of the panel on the card.


  • The next stage is to add dimension to your images using the Heartfelt Creations Deluxe flower shaping kit. I have placed one poinsettia on top of the other and added 3 gems in the centre to finish off.  You can also add dimension to the holly and the Red Cardinals.
 
 
  • I have used the Papericious Crystal Clear which gives a great snowy effect on the images and around the edges of the card.

 
  •  Adhere the Cardinal image to the left of the card and the large holly to the right.  Snip the smaller holly into 3 and the other into 2 and arrange these on top of the large holly.  Keep one smaller part of the holly and adhere just underneath the Cardinals tail feathers.


  •  To finish off the card you can use one of the quotes from the paper pad.


This is a pretty quick and easy card to create but the card I think you will agree is absolutely luxurious.
 
 
If any of my UK followers would like to purchase any of this collection or even past collections I am pleased to announce that you are able to purchase them through myself.  The website is still under construction but you can inbox me through facebook or email - nikkicraft@mail.com and pay by paypal.
If you would like any information on delivery or stock that I have please do not hesitate to contact me.
 
My USA followers can purchase the new collection via my USA website nikkiscraftingcreations.com but unfortunately it is only available for the duration of my live shows on Hochanda when the collection is launched.  However you can of course buy direct from Heartfelt Creations  or your preferred retailer.
 
Thank you so much for visiting my blog today and I hope you have found my tutorial helpful and inspiring :)


Saturday 20 May 2017

My Craft Space with a little sneaky peak at the brand New Heartfelt Creations release coming soon


It has been just over 2 years since I last did a blog post and my life has dramatically changed in this time.  The one thing that has not changed is my love for craft. 
 
I thought it would be a good idea to start with some photos of my craft space and sneaky peak of the brand new Heartfelt Creations collection which I will be launching on Hochanda TV on May 31st.
 
  My craft space as I like to call it would not have been possible without the love of my  life Ozzie who has helped me transform our living area into my craft area too.  Over the last few months we have brought some old vintage style second hand furniture some of which are still to be repainted and created the perfect craft room in which I can create in.
 
I hope to share lots of tutorials, hints and tips on a weekly basis and maybe more frequent given time.
 
The new collection is called Classic Wedding Collection which as the name suggests is wedding themed but as with all collections can be used for many occasions.
 
I'd like to thank you all for your continued support throughout my absence and like to take this opportunity to also welcome all my new followers.


Monday 16 March 2015

Altered Coffee Bean Tin Using the New Heartfelt Creations Peacock Paisley Collection

Hello Everyone :)
Almost a week and I have only just found time to do another blog post.....sorry :)
I saw a quote on Facebook the other day which said 'I could do with an extra day between Saturday and Sunday' which I thought was so correct....but then I got to thinking that maybe I could do with an extra day between everyday:)

I have been busy packing the non essentials to hopefully make it easier when we eventually move, although this has now been put back a couple of weeks.  To be fair this is good for me as I have so many things to do.....dreading the packing up of my craft room and log cabin (which has become my craft storage).  I need to be working right up until the day we move so I am not quite sure how this is going to work.  I am going to begin by packing the things I don't use on a daily basis.....this though could be then prove that I actually do not need it, but I really do find it hard to let go of some of my crafty stash.  Maybe this would be the perfect time for me to also have a big clear out:)
Altered Coffee Bean Tin
I absolutely adore this Peacock Paisley collection with all the lush jewel colours and with teal being one of my favourite colours at the moment I have to say this is on the list of my favourite all time Heartfelt Collections.
This is a coffee tin which I have decorated.  I have seen many Pringle tins that have been decorated and I thought this tin would be perfect and because it is wider than a Pringle tin you could put home made cookies in it or just give it with the coffee beans in it :)


  • Firstly I painted the tin with a thin coat of primer which helped the paper stick more easily.
  • On the lid I have adhered a Stately Circle Spellbinder die cut in teal blue card.
  • Around the edge of the lid I have added a of the strip of the decorative paper.  You could use one of the borders from the paper if you wish.
  • As my tin has a slight dome shape I have add some teal ribbon as this was easier than using paper.
  • Tip: When decorating the tin only take the paper to where the lid comes else it will make the lid very tight and eventually may tear the paper.
  • Choose some paper from the paper collection and add a panel about 3" square to what will be the front of the tin. 
  • Measure the tin and cut a piece of co-ordinating paper to fit (cut the paper slightly bigger so that it overlaps so that there is know gaps). Cut a 2 3/4" slit at the front and roll the paper to create the front collar. Glue or tape this onto the tin.
  • Cut 2 strips of paper in co-ordinating plain paper and use a decorative punch to create 2 borders. Ink the edges with a teal colour ink.  Add one around the top and one around the bottom of the tins. 
  • Add some lace around the bottom of the tin.
  • Add some satin 1/4" satin ribbon around the bottom of the tin and around the top....over the borders so that the edge of the borders are still showing.
  • Stamp and die cut several sets of the flowers.  I have coloured mine in using some lemon and teal chalk inks applying with a sponge dauber.  Use a flower shaping tool and mat to add definition to the flowers. Layer some of the flowers up as I have done in the picture.
  • Stamp and die cut about 10 of the fern leaves onto some pale green sage paper/thin card.  I have used the same colour as I have used for the borders.
  • Die cut some of the decorative swirl flourishes from the cut mat create die sets.
  • Add the leaves, flowers and flourishes to the top of the tin as in picture. I have used some 3D glue gel to create a little height.
  • Either stamp, colour and cut out the Peacock from the Feathered Peacock stamp or cut out one of the peacock images from the papers.
  • Using 3D gel or pads and add the peacock to the top of the collar on the tin.
  • Glue the rest of the flowers and leaves in a nice cluster to the front of the tin.
  • Make a triple bow with the satin ribbon and add a crstyal sparkler to the centre. Add the bow to the bottom of the cluster of flowers.
  • To finish the tin off add some Stickles glitter to the flowers and also a little to the flourishes.

I hope I have inspired you to use this collection to create some altered art :)

Take care x

Tuesday 10 March 2015

Butterfly Medley Inspiration

Hello everyone x

I hope you are all well :) x  It has been another busy few weeks both in my work and personal life.
We put our house on the market and sold it within a day to a lovely couple who want to move in the beginning of April as they have already sold theirs which meant that we have had to frantically find ourselves a new house, which thankfully we have now done and things are moving very fast :)  So if you thought I had gone missing again it is just that things have been very busy....exciting times ahead but after living in this house for almost 27 years you can imagine that although I am excited to be moving to a new house and area I am also a little sad to be moving from the house that I have brought my family up in :(

I hope you all managed to catch the Peacock Paisley launch at the weekend on Create & Craft.  I did try and do a blog post to make sure you didn't miss it but unfortunately my internet was playing up on the Friday evening and I then ran out of time so apologies if you did miss the shows. You can still watch the shows on the Create and Craft website though....I think :)

Here are a few Butterfly Medley cards.....again I am so behind with my posts I will share a few of them and then tomorrow I will share some of the Peacock Paisley samples from the shows.


Another beautiful collection which was a delight to work with.  I love the way that you can stamp and die cut all the butterflies out in one go like the flowers.  It saves so much time and Like I do with my flowers I now have a box of butterflies already stamped and die cut out in a box ready to use on my projects.

I will be back tomorrow with some Peacock Paisley projects to inspire you :)

Take care x